
How to Duplicate a Page in WordPress (or a Blog Post)
“How do I make a copy of a blog post or page in WordPress?” Learn how to clone (copy & paste)

How I personally set up my WordPress dashboard for optimum efficiency and ease of use — as someone who has built hundreds of websites.
We’ll cover…
Video Transcript:
What’s up, guys? Today I’m going to walk you through some of the basics of the WordPress backend. Just starting a brand new site from scratch so you can kind of see how to navigate WordPress if you’re not familiar, or maybe just do a refresh of the WordPress backend and see if there’s anything new for you to learn. So let’s go ahead and dive in…
Alright, so I’m going to just kind of show you guys around the back end of WordPress. So one thing that I personally like to do is customize this dashboard page a little bit. So if you go up here to Screen Options, you can check or uncheck some of these different things. Like I don’t really need to have WordPress events on there or some of this other stuff. Just leave it for now and you’ll see once you start to add plugins to your site, some stuff will pull in here too, like Google Analytics and things like that. And you can kind of rearrange where you want stuff to be at, which is nice. But I like to tweak this a little bit just because it’s the first thing that you see every time you log into your site. So might as well be useful or at least not be overwhelming with all the stuff on there.
Let’s just go down the sidebar. So the first thing is Posts. And this is where you’re going to add your blog posts. Or if you have like a journal or a recipe book or an archive really of any kind that you want to have on your site, this would be the way to do that. You can organize them by Categories or Tags, depending on how your site is structured, basically.
So next on the list is Media. So this is your Media Library where all of your photos, icons, logos, PDF’s really anything that you upload to the website is going to be shown in here, and you can sort them by different types of media or when it was uploaded, and you can add new stuff by dragging it into here. And it’s just a nice easy way to see all of your stuff.
Next is Pages. So these are very similar to Posts, but a little bit different in the way that they kind of behave. So a Page is like your standard page on a website that you see like About or Services or Team or Contact or something like that. So that’s what you want to use under this section, whereas your Posts section is going to be more focused on, I guess, things that you want to add over time. If you want to talk about events that you’re doing, new things, announcements, even tutorials or informational posts, you’ll want to have those under Posts instead of Pages.
Next is Comments. So depending if you have comments turned on or off for your site, you’ll be able to access them here. This is more useful on the blog section of your site, if you want people to be able to comment and ask questions or engage with you, they’ll show up in here.
Next is Appearance. So the first one is Themes and this is where all of your WordPress Themes are going to be held. You can browse and add new ones and try stuff out if you want to. Or you can utilize one of the themes that’s already in here, the basic WordPress themes. Or you can upload your own if you have one that you bought from somewhere else.
I’ll skip some of this stuff that’s not super necessary at the moment.
Menus is another important one. This is where you’ll actually put your navigation menu in here. So I’m just going to show you what it’ll look like. So I don’t have any Posts or Pages set up yet, so there’s nothing here. But once you start to add things to your site, they’ll pull in here and you can decide where you want to put them on the menu. So I’m just going to put an example in here and you’ll see this is basically what your menu will look like. And you can drag and drop to reorder items like this or you can nest them if you want to create like a little drop down menu and you can change the URL or the name of the link which is what people will actually click on.
And another cool thing that’s kind of hidden that you can do is appear in screen options in the top right turn on link target and that will allow you to have the links open in new tabs. So this is useful really only if you’re linking out away from your website. So if you’re linking to your Instagram or your Calendly, or who knows, any social media, a shop, or something like that, just make sure you have that open in a new tab so that doesn’t take the visitor away from your website. So that’s a nice little life hack.
Let’s skip over some of this other stuff…
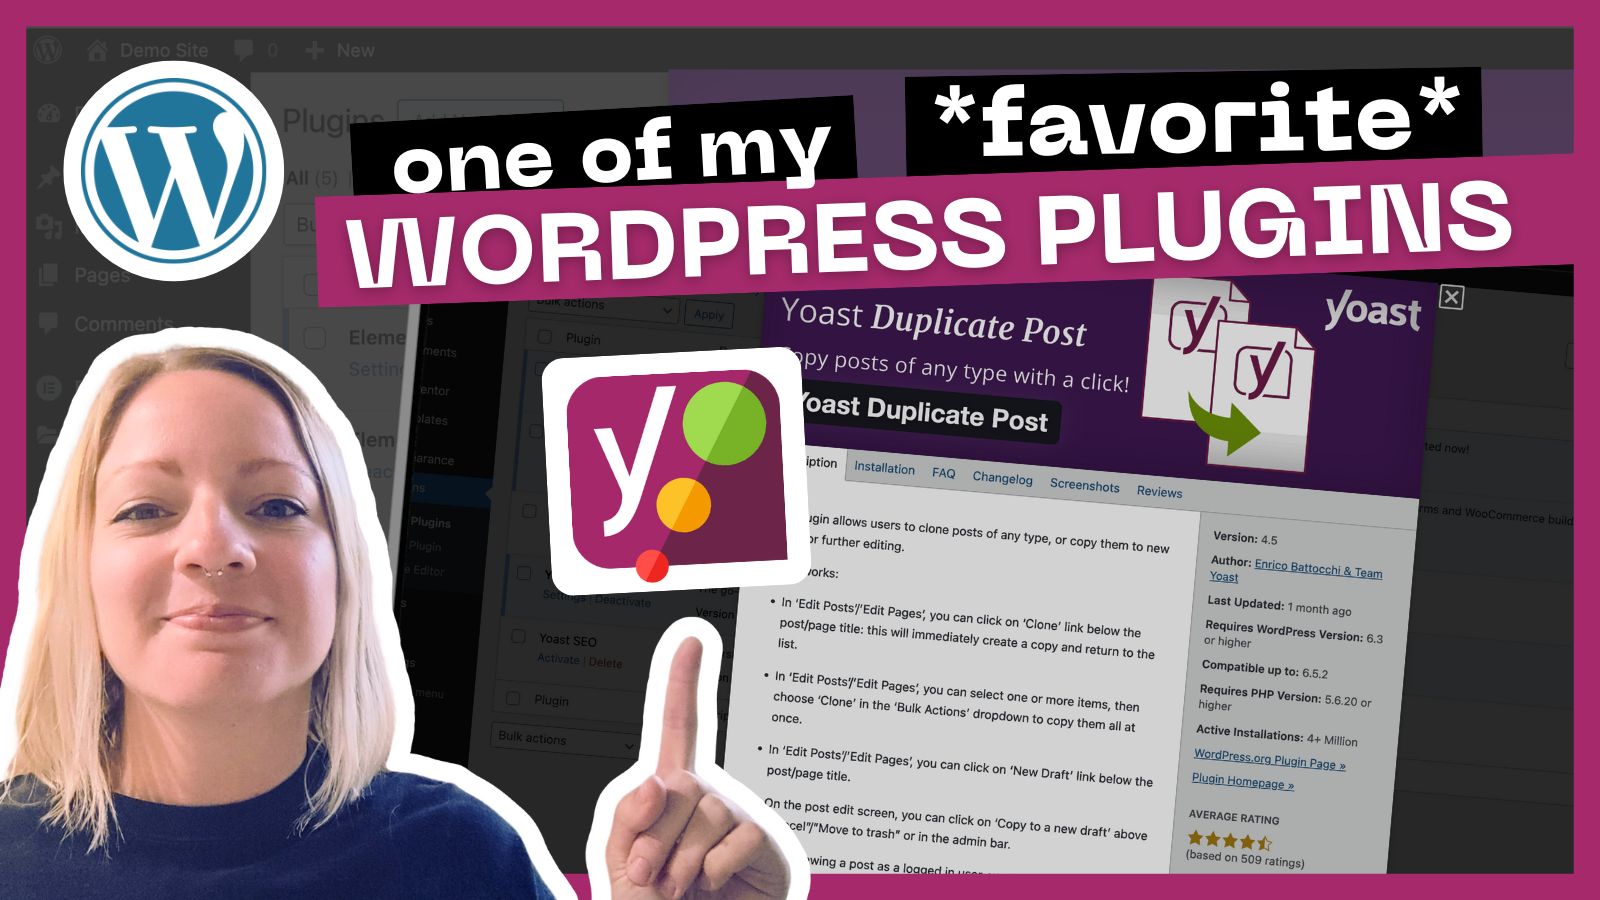
Plugins are important. So I have a couple of my favorite plugins installed in here. Now if you’re not sure what to install or where to even start, these are a couple great ones you can try out.
Elementor is a visual page builder, so you can drag and drop different widgets like videos and text and buttons and different things and create your own site design.
Google Site Kit helps you manage all your Google Analytics, ads, and any other Google software that you might use.
Yoast Duplicate Post—this just allows you to copy a blog post or a page. So if you get a page set up and you really like how you laid it out, you can just quickly copy that page and add a new one. So that’s handy.
And then Yoast SEO is a plugin for optimizing your website for ranking on Google and other search engines. So it’ll help you set up your page titles, page descriptions, keywords, that kind of stuff if you’re interested in doing that.
Otherwise you can go up here to “Add new plugin” and just kind of explore around what’s available, see if there’s anything you want to try out and you can download things from there.
Woocommerce is another great one if you are wanting to have a shop on your website and it’s free, really great. So definitely check that out.
Moving on to Users. So this will show every user on your site and what role they’re at. So you can actually assign people to different roles depending on what level of access you want them to have on your site. So there’s some other ones like Editor for example, where they can come in and edit posts or pages and stuff, but they can’t access like themes and plugins and other like critical components of your site. So that’s kind of nice if you want to have somebody help but not potentially break your site. And you can view any of the users profiles and edit their names and whatnot, emails, profile pictures. You can reset passwords through this too, which is handy if someone can’t get into your site for some reason. Yeah, that’s pretty much it. You can go edit your own profile as well and tweak things there.
Tools I don’t really use a whole lot. The only one I think worth mentioning right now would be like the import tool and this WordPress one at the very bottom here. I would only install this if you currently have a WordPress site and you’re wanting to pull in old posts or pages or anything like that, and that’s how you will do that here. It’ll let you import that file.
Moving on to Settings. So this general page is probably the most important one. So this is where you’re going to have your Site Title and your Tagline. So what I try to do as a site title is like the business name or your name if it’s your website or something like that. And then the tagline is a little bit more descriptive. So it’s like talking about what you or what the company does, but keeping it like short and sweet. So both of these things will actually show up here in the tab when somebody’s viewing your website. So that’s important. It also feed into Google and somebody shares your site on Facebook and things like that. So definitely make sure you at least put something on here.
You can also put a Site Icon, which is your little favicon that’s going to show in the top left corner of the browser tab. This one’s just a general because I’m in the backend of WordPress, but let’s try, let’s just do AOL and see what it says. It’s taking forever to load their icon for some reason. There we go. So they have a little logo there and then you can see they got descriptive with their site title and tagline, “News, politics, sports, mail and latest headlines”. So that’s basically what yours will look like.
What else?
You can set your date, format and time zone here. Tweak that however you need.
Reading. Depending on if you already have an existing site and this is a new site that you’re working to build, you could turn this on temporarily so that Google isn’t trying to like pull up this new site into searches before you’re done building it because you don’t want anybody seeing it until it’s done, obviously. So that’s an option. Just make sure that you DO NOT forget to turn this off. Otherwise your site will be basically blacklisted from Google and it’ll be hard for you to kind of rebuild that. So just make sure if you do set that, put a notification in your calendar or something to turn it off.
Moving on to Discussion. So this is what I was talking about earlier about disabling comments. So I usually undo pretty much all this stuff like that to make sure that people can’t put comments on anything unless I want them to. So those are kind of the default settings that I use, but up to you to kind of decide on that.
Media don’t really need to do anything there.
Permalinks: I like to change this to the post name just so the link is a little bit more descriptive to your blog posts or pages title instead of just being like a generic like page number. That’s just me personally, but yeah, I think that’s pretty much it.
We kind of skimmed over everything. Yeah, that’s pretty much the basics of WordPress. So I hope this video was helpful for you. If you have any questions, feel free to leave a comment and I’ll see you guys in the next video!

Save or share this post:
“How do I make a copy of a blog post or page in WordPress?” Learn how to clone (copy & paste)
Plz don’t sue me Cartoon Network. Here’s the font I mentioned: https://www.dafont.com/powerpuff-girls.font Video Transcript: What’s up, guys? I’m gonna do something
In ThIs ViDeO, I’ll walk you through how to set up a brand new shiny WordPress website using the Flywheel dashboard.